Publishing a book using only Free Software
I'm proud to announce that on Tuesday, February 4th, I published my new book, Terminal Linux Simplificado. This is the first technical book I've written, also in Portuguese, and my second book ever, after RICAmente came out in early 2020.
This is a book about how to use Linux, specifically the de facto GNU/Linux shell Bash. I feel that many books, at least in the Brazilian market, tend to focus on the extremes of Linux. Either they take a point-and-click approach much like in the Windows guides out there, or they already assume the reader is a seasoned sysadmin and go straight to the complex stuff. Mine took a middle ground and, while there is much hand-holding in the beginning, I take the reader right then to the practical command-line usage.
This post, however, is not about the contents of the book, but rather about the act writing it. I feel that there was something wholesome in how the whole process could be done completely with Free Software, including all formatting, proofwriting, all the way to the art. And there was a lot that I learned about it along the way. If you are an aspiring writer that runs Linux, I hope this post will inspire you to make the jump and publish your work as well.
Let's recap.
The Software stack
Writing text with Vim
Unlike the previous book, which I wrote entirely with LibreOffice, this technical book was written exclusively in plain text with a text editor. This was preferred because of the abundance of code samples and other technical bits in the text, similar to those O'Reilly books. A word processor would be way more challenging to maintain, given the amount of terminal-formatted text.
My choice of text editor was (and probably always will be) Vim. While I don't think there's anything "unique" in using Vim specifically for this, it's nevertheless a terminal-native editor and integrates perfectly with the rest of this terminal-centric workflow. But by all means, you can use any plain text editor of your choice.
Now of course we're writing a book with Vim, but what is the book made of? How are the words formatted and presented? My choice was to write the text formatted in Markdown, a human-readable plaintext format that "compiles" to HTML. Markdown offers me a solid way to convey everything I need to write a technical book, like:
- Inline code snippets,
like this. - Preformatted blocks of code, intended to reproduce terminal output verbatim.
- Headings and blockquotes (to serve as warning or informational bits)
If you're new to Markdown and would like a crash course in it, this guide should get you started quickly.
Version Control with Git
Writing this book was not a straight line. Much like an agile development sense, I did in waves, with me getting an inspiration streak that would last weeks, and then put it aside for months at a time. I also would pick up the work from different machines (sometimes in different cities or even countries) and had to synchronize with the latest draft files to continue, lest I miss something or undo another thing I had worked on in another machine.
At first I thought I could've just used something like a cloud sync solution, but that would become complicated given the large amount of files I started to keep around (at least each chapter of the book was a file, plus the cover and the images), unlike my previous book. Also, the potential for version conflict was large if, for example, I started working right away in a file that had not caught up with the sync for some reason.
I solved this problem by hosting the book project in a private Git repository that I hosted myself. Every workflow would start with a git pull to bring the latest version to the machine I was working on, and end with a commit explaining what was accomplished that session. By self-hosting the repository, I worried less about confidentiality issues or unauthorized access.
Another advantage of this method was that, unlike those fancy cloud sync things requiring their applications to be running in the background of a desktop session, Git allowed me to do this workflow straight from the console, no time lost and no distractions.
Finally, in retrospect, a positive side effect is that Git also can show me how my progress in this book went because of the commit history log. For example, here's a peek of my git log for this book:
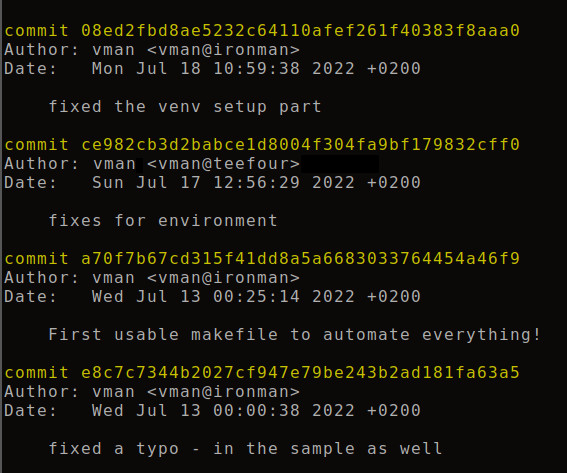
It's delightful to see your own progress in this way!
Building the book with GNU Make
Once the chapters of the book were complete, I could finally "bind" them together like a single book properly instead of just loose files. To do so, I made use of the classical Unix build Toolchain, streamlined to create a book file.
First, the steps to build the book were done through GNU make. Instead of a build script, I used a custom-made Makefile with recipes targetting each format I intended to publish into (EPUB, PDF).
To convert the Markdown files into EPUB, I followed a two-step process:
- Bundle the
.mdfiles into a large HTML document. Note that only the "body" of the HTML file is converted directly; you need to manually add the rest of the structure so it becomes valid, standards-compliant HTML. - Convert the complete HTML document into an EPUB file.
Converting to HTML first also has an advantage that you can style the document completely using CSS. This was very neat to make code snippets more readable and the visibility of the text overall.
For #1, I wrote a small Python script that uses the python-markdown module to make the HTML file. For #2, I used the Calibre suite, which includes the ebook-convert utility.
To produce a PDF, I started from the EPUB, then used ebook-convert with a few size optimizations to produce an A5-sized PDF.
Preparing Images with GIMP
Some things just don't have a better way to be explained other than through an image. Thus, I had to produce a few images from screenshots, diagrams and many other things.
My go-to solution in this case is GIMP. It has everything I need to resize, crop, annotate and otherwise manipulate images. Besides the book's images, I also used GIMP to produce another key part of the book: the cover page. I chose a resolution of 1600x1200 px for it to ensure the crispness of the image.
And besides, GIMP is freaking amazing in general. I like GIMP so much that even in Windows I would not choose a paid-for subscription of Photoshop over it.
Adding the final touches with Calibre
When all of the above was ready, I moved in to make the final adjustments of the book. The Calibre suite has a convenient Ebook editor program that neatly allows you to do the finishing touches and adjust anything in the EPUB file.
I used that program to add the cover, table of contents and other metadata of the book, and do a visual check of the content to see if it matched my expectations. When that was done, I saved the EPUB and it was ready for publishing.
Publishing
I chose to publish the book directly to Kindle via the Amazon KDP platform. One (very good) news since my last publication is that Amazon is about to sunset their proprietary MOBI format (which worked only on the Kindle) and will accept only the the standards-adopted EPUB.
This is excellent. Not only it means one less step to process for me (my EPUB is fine), but also that more reader applications and platforms will be able to accept my book as-is. Whereas previously I published a separate PDF version for non-kindle readers, this time I might not even have to do it!
Conclusion
Publishing a book using only Free Software today not only is possible, but it also probably is the most efficient way to do so. Thanks to the efficiency of the GNU tools and utilities available in Linux, one can prototype and improve on a book fast, and keep the work backed up and synchronized across multiple machines without issue.
I don't know if my next book will be a technical one, but I can bet that this workflow will be repeated. And any new improvements I find in the next adventure, I'll be sure to post them back here again.
Finally, I hope this post has inspired you to publish your next book. We need more people sharing their knowledge of Linux and Free Software. It all starts with ourselves.
Opinions are my own and do not necessarily reflect those of my current or former employers